

Επικοινωνία I2C στο Raspberry Pi 5 με PCF8574 και Python.
On Raspberry Pi 4 I was using the Python library pcf8574-io for I2C communication using the PCF8574 chip. However this library does not work on the newer Raspberry Pi 5. To be accurate, you can install it in RPi 5 using pip3 in a virtual environment (venv), however in my case I wanted my script to run as a service in global scope. So a virtual environment was not a choice. Most of the PCF8574 related code I found on the internet was outdated for Rpi4. After some search I found a Python library from jhaubrich on github which actually works. In this article I will give you a how-to guide for having I2C communication with PCF8574 chip and Python on Raspberry Pi 5. I access Raspberry from a terminal window using SSH (use PuTTY or other client).
Preparation
Make sure you have enabled I2C communication in Raspberry.
- sudo raspi-config
- Select Interfacing Options > I2C
- Enable the I2C interface and reboot Raspberry sudo reboot
Install libffi-dev (for Debian OS) which is required by the Python PCF8574 library.
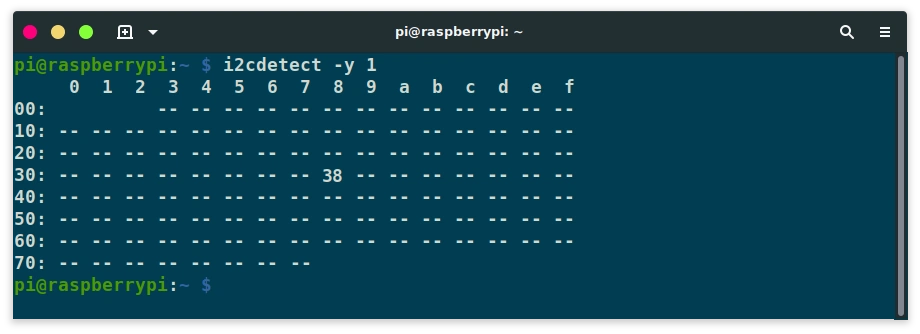
Now, we need to find the I2C address. Do an I2C scan by using the i2cdetect command.
The result will be something like the following. Keep that number, you will need it later on the coding part. In case you have 2 PCF8574 chips you will see 2 such numbers.
I will put everything in a folder named myi2c, off course you can have your own file structure. Create the folder and a test script.
cd /home/pi
sudo mkdir myi2c
sudo chown pi:pi myi2c
cd myi2c
sudo touch testpcf.py
sudo chown pi:pi testpcf.py
cd /home/pi
sudo mkdir myi2c
sudo chown pi:pi myi2c
cd myi2c
sudo touch testpcf.py
sudo chown pi:pi testpcf.py
Download the library from github and unzip it. If you don't find it I have made a copy here.
wget https://github.com/jhaubrich/pcf8574/archive/refs/heads/develop.zip
unzip develop.zip
wget https://github.com/jhaubrich/pcf8574/archive/refs/heads/develop.zip
unzip develop.zip
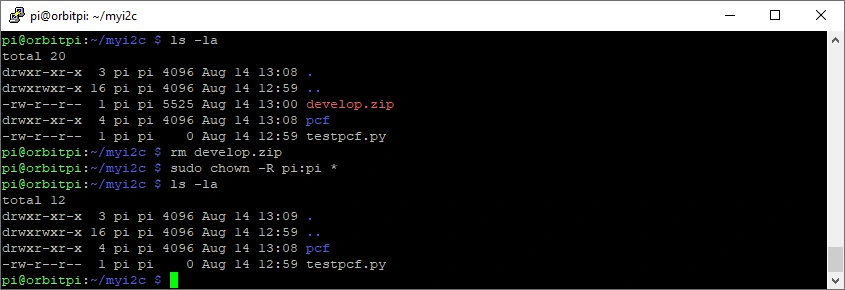
A folder named pcf8574-develop has been created. Rename that folder to pcf.
Delete downloded zip package and make sure all files are owned by the pi user.
I2C with 1 PCF8574 chip (8 bits)
Open file testpcf.py with nano testpcf.py, copy the code bellow and with right click inside the terminal paste it in the open editor area. Change the address for the I2C communication to whatever you have.
from pcf.pcf8574 import PCF8574

ADDR = 0x38# Change address if needed
mypcf = PCF8574(1, ADDR)

print("Bits: 0-7")
resp = ''
for i in range(8):
    val = 1 if mypcf.port[i] == True else 0
    resp += 'PIN'+str(i)+': '
    resp += str(val)+', '
print(resp)

mypcf.close()
from pcf.pcf8574 import PCF8574

ADDR = 0x38# Change address if needed
mypcf = PCF8574(1, ADDR)

print("Bits: 0-7")
resp = ''
for i in range(8):
    val = 1 if mypcf.port[i] == True else 0
    resp += 'PIN'+str(i)+': '
    resp += str(val)+', '
print(resp)

mypcf.close()
Save the file (Control + X, then type Y and click enter). Now its time to test our script. This script will echo the values of the 8 bits (1 for HIGH, 0 for LOW). Execute the script.
If you get an error mentioning get_pin_state or read_byte in the error message, then the address you have provided is wrong.
I2C with 2 PCF8574 chips (16 bits)
Open file testpcf.py with nano testpcf.py, copy the code bellow and with right click inside the terminal paste it in the open editor area. Change the addresses for the I2C communication to whatever you have.
from pcf.pcf8574 import PCF8574

ADDR1 = 0x38# Change address if needed
ADDR2 = 0x39# Change address if needed
mypcf1 = PCF8574(1, ADDR1)
mypcf2 = PCF8574(1, ADDR2)

print("Bits: 0-7")
resp = ''
for i in range(8):
    val = 1 if mypcf1.port[i] == True else 0
    resp += 'PIN'+str(i)+': '
    resp += str(val)+', '
print(resp)

print("Bits: 8-15")
resp = ''
for i in range(8):
    val = 1 if mypcf2.port[i] == True else 0
    resp += 'PIN'+str(i)+': '
    resp += str(val)+', '
print(resp)

mypcf1.close()
mypcf2.close()
Save the file (Control + X, then type Y and click enter). Now its time to test our script. This script will echo the values of the 8 bits (1 for HIGH, 0 for LOW). Execute the script.
If you get an error mentioning get_pin_state or read_byte in the error message, then the addresses you have provided are wrong.
Setting port values
If you want to set the value of a port it is as simple as this:
from pcf.pcf8574 import PCF8574

ADDR = 0x38# Change address if needed
mypcf = PCF8574(1, ADDR)

mypcf.port[0] = True
mypcf.port[1] = False
mypcf.port[2] = False

mypcf.close()
from pcf.pcf8574 import PCF8574

ADDR = 0x38# Change address if needed
mypcf = PCF8574(1, ADDR)

mypcf.port[0] = True
mypcf.port[1] = False
mypcf.port[2] = False

mypcf.close()
Διαβάστε επίσης
- Το καλάθι είναι άδειο
Εργασίες
Ολοκληρωμένα έργα
IOS Rentals v4.1
Μέθοδος πληρωμής Nexi XPay (Alpha bank), συγχρονισμός τιμών, βελτιώσεις18 Απριλίου 2026IOS Hotels v3.6
Χρέωση ανά άτομο, μοναδικά χαρακτηριστικά, HTML email, νέες μεθόδοι πληρωμής29 Μαρτίου 2026IOS Rentals v4.0
Αυτόματη δημιουργία κουπονιών, εκδόσεις λογισμικού11 Φεβρουαρίου 2026IOS Reservations 6.0
Διάφορες βελτιώσεις. Απαιτείται για IOS Rentals 4.0+05 Φεβρουαρίου 2026IOS Rentals v3.8
Paypal checkout, διαγνωστικός έλεγχος και άλλα29 Νοεμβρίου 2025Open Shop 4.0, 4.1, 4.2
Removal of inline events, Paypal Checkout, dialog messages, myPOS19 Νοεμβρίου 2025IOS Rentals v3.7
Διαχείριση ζημιών οχημάτων, υποστήριξη Ψηφιακού Πελατολογίου της ΑΑΔΕ28 Ιουνίου 2025IOS Rentals v3.6
Εξαγωγή/Εισαγωγή δεδομένων, επιλογές κράτησης, συνολική εικόνα και NBG.16 Απριλίου 2025IOS Hotels 3.5
Κριτικές, συνεργάτες, IOS Sync, Συνολική εικόνα29 Μαρτίου 2025Open Shop 3.9
Βελτιώσεις στις μεθόδους αποστολής και πληρωμής καθώς και στη διαχείριση παραγγελιών.28 Φεβρουαρίου 2025
